As our paid search clients grow in media spend, we encourage them to migrate away from in-platform optimisation and explore the powerful features available from SA360. This can be a steep learning curve for any PPC professional, and something I experienced a couple of years ago. To share my knowledge, I’ve put together an extensive how-to guide for useful SA360 features, including a brief overview of what each feature is and then how to set these up.
What this guide will include:
- Setting up performance views
- Setting up budget bid plans
- Creating an executive report
- Creating a floodlight goal
- 4a. Creating floodlight formula columns
- Creating floodlight instructions
- Creating an adaptive campaign
- 6a. Location
- 6b. Remarketing
- 6c. Product Groups
- Setting up ad copy tests
1. Set-Up Performance Views
When working in an advertiser account, you may want to save the columns you’re looking at so that you can easily come back to them, this is where performance views come in handy.
By creating performance views, it becomes much easier to analyse performance without having to select multiple engines/columns every single time that you want to review performance data.
When it comes to setting these up, it’s really simple, follow the below steps:
- Firstly, select all the columns and filters you’d like to save (e.g accounts, campaigns, particular conversion columns).
- View the drop-down menu of ‘views’ and select ‘save view’.
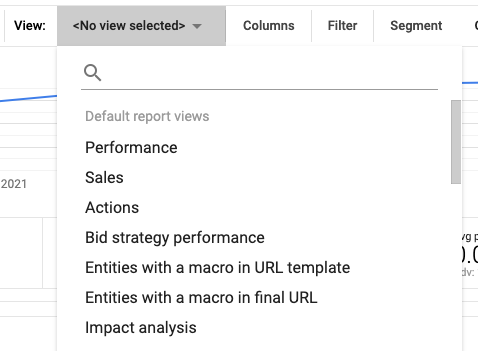

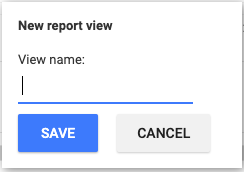
- Give your view a name.
- You’re all done!
2. Set-up budget bid plans
A budget plan helps you to allocate and manage spend across particular campaigns and a specific time range. If you opt-in to a budget bid strategy, this will then control spend and bids for you based on your targets.
Firstly, you’ll need to set up a budget group for the campaigns you’d like included in your budget plan.
- Go to ‘budget management’ > ‘budget groups’ > ‘+new’.
- Give your budget group a relevant name.
- Set your budget group currency.

Once you’ve set-up your budget group, you can begin to set-up your budget plan.
- Go to ‘budget management’ > ‘budget plans’ > ‘+budget plans’.
- Select a time range, budget group, and goal (conversion goal/floodlight activity).
- Set a target spend, add performance benchmarks (e.g CPA), and select ‘budget bid strategy’ if you’d like SA360 to optimise certain items (budgets, device, location and remarketing).
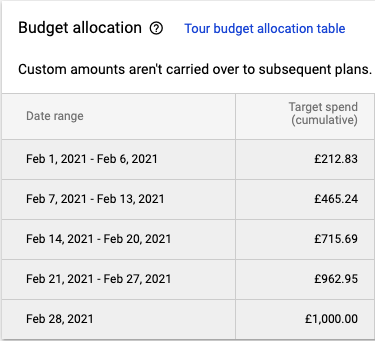
- View pacing and allocations based on the budget plan you’ve set up, review settings and save.
3. Create an executive report
Instead of spending the time exporting data from SA360 and formatting this data within a spreadsheet, you can create an executive report all within SA360.
An executive report can have multiple pages, with multiple charts. The available charts are bar charts, mixed bar and line charts, pie charts, and tables.
To create an executive report, which can be then shared with the client via a URL. All you need to do is follow the below steps:
- Go to ‘executive reports’ in the top navigation bar of SA360.
- Click ‘create report’.
- Give the report a name.
- Select the agency, advertiser and account whose data you want in the report.
- Optionally, update the currency.
Once you’ve created the report, you can begin creating the charts that will sit within your report pages. To do this, you’ll need to do the following:
- Set a time range and comparison period if needed.
- Select the metrics needed for your report.
- If you need to look at specific performance of an account, e.g campaign, ad copy, labels, etc. You can add a filter to your report which will enable you to do so.
- When you’re finished, choose ‘generate report’ and you’re all done.
- As mentioned above, this can be shared with the client too!
- Go to ‘manage and schedule reports’ and select the link icon to get the URL.

4. Set up floodlight goals
To begin tracking floodlights, you’ll need to set-up the floodlight goal in SA360, this will involve creating a new floodlight ‘column’. This will enable you to accurately report on conversions or revenue.
To find this, go to ‘columns’ > ‘custom conversions’ > ‘floodlight’ > ‘new column’.

Once you get to the set-up stage, a box (like the below) will appear, and from there you can begin to fill out the criteria for your floodlight goal. To do this, you’ll need the floodlight activity being used for this goal, the custom dimension filter (such as the event name or URL path directory).
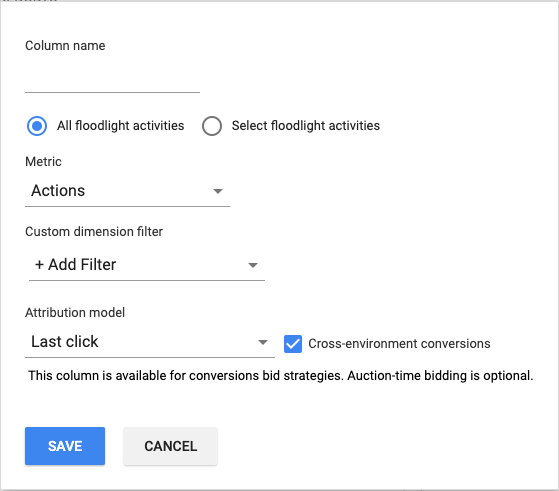
If you don’t have this information, you will be able to identify the floodlight activity and custom dimensions being used by running Google Tag Assistant on the relevant pages and reviewing the report under ‘floodlight’.
4a. Formula columns
If you have multiple floodlight columns, you may want to combine these to get an overview of total conversions. To do this, you’ll need to go to ‘formula columns’ within the ‘columns’ option as listed above.
Click ‘+NEW COLUMN’ and you’ll then be able to search for the columns you’d like to total, between each column, you’ll need to add ‘+’ to create the formula which will add these together. Once done, you’ll need to give your formula column a name (e.g ‘total conversions’) and click ‘save‘.
5. Set up floodlight instructions
A floodlight instruction manages the way that SA360 reports on a floodlight activity or activity group without changing the actual activities. As this is only for reporting purposes, you will only see the results of a floodlight instruction in SA360 reports.
The types of floodlight instructions available are as follows:
- Inclusion status
- Excludes a floodlight activity or activity group from appearing in SA360.
- Toggle
- Switch a transaction floodlight activity to an action activity or vice versa.
- Conversion ID source
- This instruction tells SA360 which standard variable in the floodlight tag or event snippet contains the conversion ID.
- % revenue replacement
- Change the revenue reported by a transaction activity. For example, removing advertising costs from the total revenue.
- Amount revenue replacement
- Similar to the above, this instruction changes the revenue reported by a transaction activity. However, for this, you can select a fixed revenue amount.
- Currency conversion
- Converts revenue from one currency to another.
- Weighted action
- Place more importance on an action by applying priority or ‘weight’ to it.
Please note, to add, edit or remove a floodlight instruction, you’ll need to be an agency manager or advertiser manager.
To set-up your floodlight instruction, follow the steps below:
- Within the desired advertiser account, go to ‘advertiser settings’.
- Click the floodlight tab and select ‘floodlight instructions’ > ‘+floodlight instruction’.
- Select the floodlight activity you’d like to create an instruction for.
- Select the floodlight instruction type (from the list above).
- Click ‘save’ and you’re all done!
6. Creating an adaptive campaign
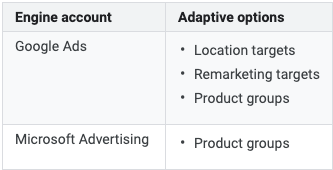
Adaptive campaigns allow SA360 to automatically create or adapt location and remarketing targets and product groups. SA360 will use the goal and historical performance data to create a more focused target or product group. For example, an adaptive location target may contain one or more geographic locations which perform differently than the larger area (such as targeting the UK and SA360 adapting locations within the UK).
6a. Location adaptive targeting
To enable adaptive targeting in a campaign, you’ll firstly need to make sure auto-tagging is enabled on the advertiser account and has a minimum of 32 days of performance history before it can begin to generate auto location targeting (this applies to all adaptive campaigns).
There are two options when setting up adaptive location targeting; with a SA360 bid strategy or without a bid strategy.
Firstly, with a bid strategy:
- Select the campaign you’d like to adapt and head to the ‘campaign settings’.
- Ensure that a SA360 bid strategy is applied, if a Google Ads bid strategy is applied, go ahead and remove this (for this to work the campaign must be using a SA360 bid strategy).
- When selecting your bid strategy, remember to select the ‘location target bid adjustments’ check box.
- Click ‘save’.
- Back to ‘campaign settings‘, go to ‘adaptive settings’ and select the ‘location targets’ check box, and click ‘save’ for the final time.
- You can set up email notifications so you’re aware of each change that is made once the adaptive campaign is live.
When it comes to setting this up without a bid strategy, the steps are very similar to the above, however, at step 2, ensure that no bid strategy is applied, you then select manual bidding and a conversion goal for your campaign to work towards.
6b. Remarketing adaptive targets
To set up remarketing adaptive targets, the steps are the same as the location adaptive targets. However, you’ll need to select the ‘remarketing target bid adjustments’ check box in bid strategy settings. Then, you’ll need to select ‘remarketing targets’ within the adaptive settings and you’re ready to go!
6c. Product group adaptive targets (shopping campaigns)
SA360 can monitor your Merchant Center feed and automatically subdivide product groups by the product ID attribute using criteria that you define in a conversion goal or SA360 bid strategy.
New product groups will be created based on one of the following criteria:
- Create new groups for products that generate similar amounts of revenue
- Create new groups for products that generated a similar amount of conversions
To enable adaptive shopping campaigns, follow these steps:
- Select the shopping campaign you want to adapt and head to ‘campaign settings’.
- In campaign settings, ensure a conversion goal or SA360 bid strategy is applied.
- Then, go to ‘adaptive settings’, select the ‘product groups’ check box and then ‘save’.
- As above, you can also opt into email notifications here to keep up to date with any product group changes.
7. Setting Up Ad Copy Tests
Setting up an ad copy test within SA360 can help you to determine which ads within an ad group are best at helping you achieve your campaign goals. The test automates the process and equalises other variables, such as the device type, which can impact ad performance.
What does the process look like?
- Select an ad group for your ad copy split-test (the ad group must receive a minimum of 1000 impressions per week).
- Decide on the goal that you want the ad group to achieve, such as conversions.
- Choose the statistical significance that you want the ad copy test to achieve.
- Launch your test and begin to monitor the results!
When it comes to viewing ad copy tests, in the left navigation panel, go to ‘ad copy tests’. You will then be able to view all running, cancelled, completed or scheduled ad copy tests along with the settings for each test – simply click a test to see the results!


